Wednesday, May 30, 2012

Different ways for calling a code behind function from Javascript

Recently, one of my colleague asked about the different ways for calling a code behind function from JavaScript. There are different ways to call a code behind function and I decided to list down here each with example.

According to me, there are four main possible ways to call a function from Javascript:

1. Pagemethods in JS AND WebMethod in code behind class
2. IPostBackEventHandler in
codebehind class AND _doPostBack in JS 
3. ICallbackEventHandler in code behind class
4. Ajax/Jquery AND ASHX handler

Lets check each of above methods
with example and explanation.

1. Pagemethods in JavaScript AND WebMethod in cs

For using Pagemethods in JavaScript, we need to add Script Manager on aspx page. For using Ajax .Net (script manager, update panel) we need to add below settings in web.config and also System.Web.Extensions assembly is required.

<configuration>
    <system.web>
        <pages>
            <controls>
                <add tagPrefix="asp" namespace="System.Web.UI" assembly="System.Web.Extensions, Version=1.0.61025.0, Culture=neutral, PublicKeyToken=31bf3856ad364e35" />
            </controls>
        </pages>   
    </system.web>
</configuration>
  

ASPX Page Code:

<script language="javascript" type="text/javascript">
    function GetCityValue() {
        PageMethods.GetCity("USA", onSucceeded, onFailed);
    }
    function onSucceeded(result, userContext, methodName) {
        document.getElementById("div1").innerHTML = result;
    }
    function onFailed(error, userContext, methodName) {
        alert("An error occurred")
    }
</script>

<asp:ScriptManager ID="ScriptManager1" runat="server" EnablePageMethods="true">
</asp:ScriptManager>
   
    <div>
<input type='button' name="btncity"  value="GetCityValue" onclick="javascript:GetCityValue()"/></div>
    <div id="div1"></div>


Codebehind Code:

[System.Web.Services.WebMethod()]
        public static string GetCity(String strCountry)
        {
            string strCity = string.Empty;
            if (strCountry == "USA")
                strCity = "NewYork";
            else
                strCity = "OtherCity";
            return strCity;
        }


Here 2 things need to take care:

1. Method in cs file must be public static and with attributes [System.Web.Services.WebMethod()]
2. Set EnablePageMethods="true" in Scriptmanager

2. IPostBackEventHandler in code behind class AND __doPostBack in JS

ASPX Page Code:

<script language="javascript" type="text/javascript">
    function GetCityValue() {
        var pageId = '<%=  Page.ClientID %>';
        __doPostBack(pageId, "USA");
    }
</script>
   
    <div>
<input type='button' name="btncity"  value="GetCityValue" onclick="javascript:GetCityValue()"/></div>
    <div id="div1"></div>
<asp:Label id="lblInfo" runat="server"></asp:Label>

Codebehind Code:

public partial class SampelForm : System.Web.UI.Page, IPostBackEventHandler
    {

        public string GetCity(String strCountry)
        {
            string strCity = string.Empty;
            if (strCountry == "USA")
                strCity = "NewYork";
            else
                strCity = "OtherCity";
            return strCity;
        }

        public void RaisePostBackEvent(string eventArgument)
        {
            string val = GetCity(eventArgument);
            lblInfo.Text += "City - " + val;
        }
    }


Here, with IPostBackEventHandler, Page is submitted to server (postback) and so user experience will NOT be as good compare to other methods.


3. ICallbackEventHandler in code behind class


ASPX Page Code:

<script language="javascript" type="text/javascript">
    function GetCityValue() {
        CallToServer('USA');
    }

    function ReceiveServerData(arg, context) {
        document.getElementById("div1").innerHTML = "Date from server: " + arg;
    }
</script>
   
    <div>
<input type='button' name="btncity"  value="GetCityValue" onclick="javascript:GetCityValue()"/></div>
    <div id="div1"></div>
<asp:Label id="lblInfo" runat="server"></asp:Label>

Codebehind Code:

public partial class SampelForm : System.Web.UI.Page, IPostBackEventHandler
{

        public string GetCity(String strCountry)
        {
            string strCity = string.Empty;
            if (strCountry == "USA")
                strCity = "NewYork";
            else
                strCity = "OtherCity";
            return strCity;
        }

        public void RaisePostBackEvent(string eventArgument)
        {
            string val = GetCity(eventArgument);
            lblInfo.Text += "City - " + val;
        }
}

Here, with ICallbackEventHandler, Page is NOT submitted to server and so user will experience a quick response from server (No Postback). 

4. Ajax/Jquery AND ASHX handler

ASPX Page Code:

//JQuery JS File is required.

<script src="https://ajax.googleapis.com/ajax/libs/jquery/1.6.2/jquery.min.js" type="text/javascript"></script>

<script language="javascript" type="text/javascript">

    function GetCityValue() {
        $.ajax({
            type: "POST",
            url: "AjaxHandler.ashx?method=getcity",
            dataType: "text",
            success: ReturnData2,
            error: function(XMLHttpRequest, textStatus, errorThrown) {
                alert(textStatus);
            }
        });
    }

    function ReturnData2(data) {
        $("#div1").text(data);
    }

</script>
    <div>
<input type='button' name="btncity"  value="GetCityValue" onclick="javascript:GetCityValue()"/></div>
    <div id="div1"></div>


Codebehind Code:

First of all we need to create a Handler class file. To add http handler class file (.ashx), right click on Project Name in Solution explorer and click on Add New Item. Click on Generic Handler and click Add button. It will add .ashx file, here in our example we name it as AjaxHandler.ashx.


Now copy the below code in ProcessRequest method:


        public void ProcessRequest(HttpContext context)
        {
            if (context.Request.QueryString["method"] == null)
                return;
            string methodname = context.Request.QueryString["method"];
            MsgResponse objResponse = new MsgResponse();
            string Returnmsg = string.Empty;
            switch (methodname)
            {
                case "getcity":
                    context.Response.ContentType = "text/plain";
                    Returnmsg = Getcity();
                    break;
            }
            context.Response.Write(Returnmsg);
        }

        private string Getcity()
        {
            return "NewJersey";
        }


Here, we pass the method name in querystring from Javascript Ajax call (url: "AjaxHandler.ashx?method=getcity",) and check that method name in ASHX handler. Finally, what we write to context.Response.Write will be send back to Javascript. Here, we can also use JSON to send objects in JSON format. 


Here, each way has its own advantage and disadvantage. In my opinion method 1 with Pagemethods is useful if you want to call codebehind method rarely. If you are calling server side functions more frequently, its better to use 4th method (Ajax and ASHX handler) to call server side function.


Happy Programming !!!

Sunday, January 29, 2012

Get Latest from TFS and Build project through batch file

Recently, We had requirement where Testing team required daily build of project for Testing. So I decided to automate the process with help of batch file.

Approach for making build process automated is to use Team Foundation Build Service. Team Foundation Build Service is a Windows service that is listed in different locations within the operating system. Where it is listed depends on whether Team Foundation Build Service is running as a Windows service or an interactive service.

For using Team Foundation build service, you need to learn about the build service, agents, and controllers. 

- One needs to configure and manage Team Foundation Build Service to enable your team to automatically and consistently build, test, and deploy your software in a distributed environment.
 

- Then need to install the build service and enable it to build projects that are under version control in team project. 

- Then create and manage build controllers, which handle requests for queued builds, and build agents, which handle the work of building, testing, and deploying your application. 


So overall approach is useful if you are developing Product with large code base and have large teams for developing different modules. Complete understanding of Team Foundation Build System on MSDN is available at

http://msdn.microsoft.com/library/dd793166%28VS.100%29.aspx

But we require something simple for our small project which creates Build for Testing Team as well as for release and I decided to make a batch file which
- Takes Latest from TFS
- Prepare build of project with MSBuild command
- Logs the error while building project
- Sends the email for success / failure.
- Then configured to run created batch file daily through Windows Task Scheduler.

Batch file works in below way:

- sets the enviornment variables so that Commands which can be run on VS Command prompt can also run from batch file with below command:


call "C:\Program Files (x86)\Microsoft Visual Studio 9.0\VC\vcvarsall.bat" (Set path based on installed VS Version)

- Get latest from TFS (Directory must be mapped with TFS)


- Get Latest operation is done through tf get command


tf get "%Solutiondir%" /force /recursive /login:Installshield,SHSH@kk5

- prepare build through msbuild command


msbuild "%Solutiondir%\WinTestApp.sln" /t:rebuild /p:Configuration=Release;Platform="x86";DefineConstants="SSWind SSAdmin SSNKDTT SSCompany10";OutDir=bin\BuildOutput\ /fileLogger /flp:logfile="%ErrLogFilePath%";errorsonly

- msbuild command sets Configuration, Platform and conditional compilation symbols
and logs the Error occurred during build process in text file

- copies all dlls / exe to specified destination directory (folder name created with DateTime format)


- Email is send to specified sender with successful or failure message


- Email send with Error Log as attachment


- Email send through Blat utility(Blat is a Win32 command line utility that sends eMail using SMTP)


Points to take care:


- Change the path of Project Directory and destination folder and also set the Email Variables (From, to, user, pwd)

- Spaces should be avoided in name of folders as spaces may create problem in batch files


- Blat official website for downloading exe and for sample examples: http://www.blat.net/


- For using Blat to send mail, download the files and copy blat.exe (and other supporting files) to some folder (say blat) and run command as below to send mail:


cd E:/tarak/blat :: move to installation folder


blat %tempmail% -to %tomail% -f %frommail% -server %serveradd% -subject "Build Exe Failed" -u %mailuser% -pw %mailpwd% -attacht D:\Projects\BuildErr\errors.txt

Batch file can be downloaded from below URL:
https://docs.google.com/open?id=0B0L2UE58PUp8YWUyNDU5NDItOTcyMC00NGVhLWEzODItMzcwZTA5YjRhYWMx

You can always send comments for any suggestions or any assistance for further enhancement.

Happy Programming !!!

Monday, October 10, 2011

Compact Access 2007 Database using JRO / DAO

In one of my winform project, we are using Sql Server as well as Microsoft Access 97 as Database. And since size of MS Access DB file grows, at some point of time we Compact the Access Database file through coding by .Net. Today, I am sharing my experience on using different techniques to compact Access DB file using .Net.

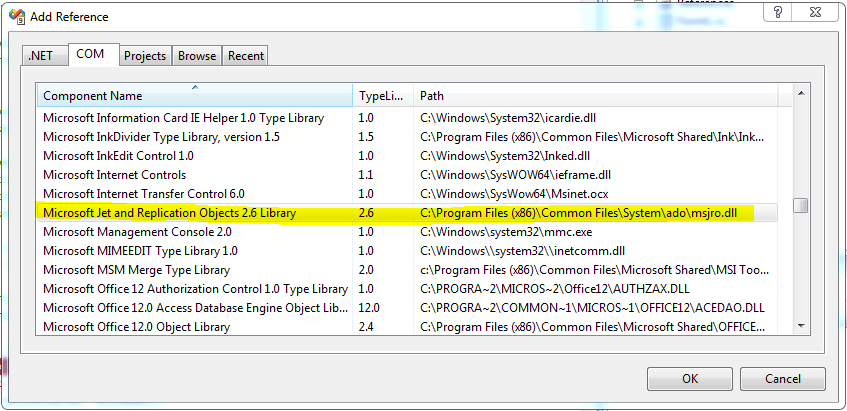
We are using Microsoft Jet and Replication Objects 2.6 Library (JRO) to compact Access 2007 Database. But during last week we found two problems in using JRO:

1. JRO was NOT working on 64 bit Computer. I tested on Windows Server 2008 R2 and it fail to Load. (JRO might work on 64 bit if you have MS Office installed)
2. When JRO compacts DB (on XP 32bit), database file created by compaction is of Access 2002 - 2003 File format. So if your Original file is of 2007 Format then after compaction by JRO, DB File is converted to 2002 - 2003 File format.

For solving above 2 problems, I have then used DAO to compact database, which is more accurate and also worked on 64bit Server.

Here, I am giving steps to implement Compaction using JRO and DAO both.

Steps to compact Access DB using JRO:

App.config file:
<?xml version="1.0"?>
<configuration>
<appSettings>
<add key="SourceDB" value="Provider=Microsoft.ACE.OLEDB.12.0;Data Source=D:\Test\Test2007.accdb;Jet OLEDB:Engine Type=5"/>
<add key="DestDB" value="Provider=Microsoft.ACE.OLEDB.12.0;Data Source=D:\Test\Test2007BK.accdb;Jet OLEDB:Engine Type=5"/>
</appSettings>
</configuration>


1. Create a winform application and add a reference of Jet and Replication Objects 2.6 Library. See the diagram below:

2. Add form to solution and add below code in form Load event:

string SrcDBName = ConfigurationManager.AppSettings["SourceDB"];
string DestDBName = ConfigurationManager.AppSettings["DestDB"];

        int ReturnCode = 0;
        JRO.JetEngine objJRO = null;
        try
        {
            objJRO = new JRO.JetEngine();
            objJRO.CompactDatabase(SrcDBName, DestDBName);
        }
        catch (Exception ex)
        {
            StackTrace STrace = new StackTrace(ex, true);
            StackFrame StkFrame = STrace.GetFrame(STrace.FrameCount - 1);
            string Disp_Msg = "Message:\t" + ex.Message + Environment.NewLine;
            Disp_Msg += "Error Date:\t" + DateTime.Now.ToString("dddd, MMM d yyyy HH:mm:ss");

            File.AppendAllText(Path.GetDirectoryName(Application.ExecutablePath) + @"\CompactErr.txt", Disp_Msg + Environment.NewLine + "Stack Trace:\t" + ex.StackTrace + Environment.NewLine + Environment.NewLine);
        }
        finally
        {
            Marshal.ReleaseComObject(objJRO);
            objJRO = null;
        }

3. Most Important: change the Target Platform to x86 (From Project property window -> Click on Build tab and then change Platform Target to x86.

4. Run the application and will create new compacted Access DB file. But as I mention earlier its format will always be 2002-2003 format.


Steps using DAO:

1. Create a winform application and Add a reference of DAO - Microsoft Office 12.0 Access Database Engine Object Library, and the DLL is ACEDAO.DLL. See the diagram below:

2. Add form to solution and add below code in form Load event:

using AccInterop = Microsoft.Office.Interop.Access;
AccInterop.Dao.DBEngine objDBEngine = null;

string SrcDBName = ConfigurationManager.AppSettings["SourceDB"];
string DestDBName = ConfigurationManager.AppSettings["DestDB"];
objDBEngine = new AccInterop.Dao.DBEngine();
objDBEngine.CompactDatabase(SrcDBName, DestDBName);

3. You can keep target platform to "Any CPU" or x86. If you keep Any CPU then you need to install MS Access Database Engine 2010 - x64 version. And if you keep x86 then you need to install MS Access Database Engine 2010 - x86 version.

4. Run the application and will create new compacted Access DB file. Format of compacted file will be same as Original file format.


5. we need to install 2 components for DAO to work correctly.
5.1. Microsoft Access Database Engine 2010 (x86 or x64).
Link from MSDN to download: http://www.microsoft.com/download/en/details.aspx?id=13255
5.2. Microsoft Office 2010: Primary Interop Assemblies.
Link from MSDN to download: http://www.microsoft.com/download/en/details.aspx?id=3508

If you have any queries, you can write comments and I will be glad to reply you.

Happy Programming !!!

Thursday, June 2, 2011

Background Worker Example - Filling dataset in separate thread - Part 2

In my previous article [BackgroundWorker Component Overview in Winforms - Part 1], I described the working of BackgroundWorker component in Winform Application. In this article, I will demonstrate how to use the BackgroundWorker component to run a time-consuming operation on a separate thread. Example fills the dataset in background thread and also shows progress-bar while method is running.

First I created a class which inherits from BackgroundWorker Class which contains following key elements:

  1. An Enum ActionType : which contains Enum of Actions to do in background. i.e. FillCustData, DownloadCustImgs, etc will be used in method OnDoWork
  2. A public variable DoWorkArgs of type Dictionary<String, Object> for passing Arguments in key, value pair to worker method.
  3. A public class ResultData which contains properties like ResultObject, MsgText, PassedArgs etc to pass information from worker thread to UI layer. So UI layer can know what happened during background and take action based on Result.
  4. A protected override void OnDoWork (DoWorkEventArgs e) method - a key method which is executed during in separate thread.
  5. A winform with Button to start process in background and progressbar component to show progress while method is executing in background.

Here is the code for custom APKWorker Class which inherits from BackgroundWorker Class:

using System;
using System.Collections.Generic;
using System.Linq;
using System.Text;
using System.Data;
using System.ComponentModel;

namespace TemplateApp
{
    public class APKWorker : BackgroundWorker
    {
        private ActionType ActionName { get; set; }
        private DataTable dtResult = null;
        public Dictionary<String, Object> DoWorkArgs = new Dictionary<string, object>();
       
        public APKWorker()
        {
            this.WorkerReportsProgress = true;
            this.WorkerSupportsCancellation = false;
        }

        public APKWorker(ActionType ActionName) : this()
        {
            this.ActionName = ActionName;
        }

        protected override void OnDoWork(DoWorkEventArgs e)
        {
            switch (this.ActionName)
            {
                case ActionType.RegisterUser:
                    //Call to method RegisterUser()
                    break;
                case ActionType.Insert_Usage_Statistic:
                    //Call to method Insert_Usage_Statistic()
                    break;
                case ActionType.FillUsers:

                    int deptid = 0;
                    if (DoWorkArgs.Keys.Contains("deptid"))
                        deptid = (int)DoWorkArgs["deptid"];


                    dtResult = new DataTable();
                    dtResult.Columns.Add("UID", Type.GetType("System.Int32"));
                    dtResult.Columns.Add("UserName", Type.GetType("System.String"));
                    DataRow dr = null;
                    this.ReportProgress(30, "Started");
                    System.Threading.Thread.Sleep(2000);
                    for (int i = 0; i < 5; i++)
                    {
                        dr = dtResult.NewRow();
                        dr["UID"] = i;
                        dr["UserName"] = "Test" + i.ToString();
                        dtResult.Rows.Add(dr);
                    }
                    this.ReportProgress(80, "Data Filled");
                    System.Threading.Thread.Sleep(2000);
                    e.Result = new ResultData { PassedArgs = DoWorkArgs, MsgText = "Data Filled.", MsgType = ResultData.MessageType.Success, ResultObject = dtResult };
                    this.ReportProgress(100, "Completed");
                    break;
            }
            base.OnDoWork(e);
        }

        public enum ActionType
        {
            RegisterUser,
            Insert_Usage_Statistic,
            FillUsers
        }
    }

    public class ResultData
    {
        public Object ResultObject { get; set; }
        public string MsgText { get; set; }
        public MessageType MsgType { get; set; }
        public Dictionary<String, Object> PassedArgs { get; set; }

        public enum MessageType
        {
            Success,
            Failure
        }       
    }

}

Code to write in Winform for Calling background worker class:

        private void btnTest_Click(object sender, EventArgs e)
        {
            this.progressBar1.Minimum = 0;
            this.progressBar1.Maximum = 100;
            APKWorker objWorker = new APKWorker(APKWorker.ActionType.FillUsers);
            objWorker.DoWorkArgs.Add("userid", 10);
            objWorker.DoWorkArgs.Add("deptid", 3);
            objWorker.RunWorkerCompleted += new RunWorkerCompletedEventHandler(objWorker_RunWorkerCompleted);
            objWorker.ProgressChanged += new ProgressChangedEventHandler(objWorker_ProgressChanged);
            objWorker.RunWorkerAsync();

        //Implementation Example 2:
        //APKWorker objWorker = new APKWorker();
        //objWorker.DoWork += new DoWorkEventHandler(objWorker_DoWork);
        //objWorker.RunWorkerAsync();
        //void objWorker_DoWork(object sender, DoWorkEventArgs e)
        //{
        //    MessageBox.Show("hello");
        //}
        //Above example is useful, if you need to implement some custom logic in DoWork method. Here, first don't pass Actionname from Constructor,
        //then add the 2nd line - objWorker.DoWork += new DoWorkEventHandler(objWorker_DoWork); and write custom logic in objWorker_DoWork
        }       

        void objWorker_ProgressChanged(object sender, ProgressChangedEventArgs e)
        {
            this.progressBar1.Value = e.ProgressPercentage;
            this.lblMsg.Text = (string)e.UserState;
        }

        void objWorker_RunWorkerCompleted(object sender, RunWorkerCompletedEventArgs e)
        {
            ResultData ResultObj = (ResultData)e.Result;
            DataTable dtUser = (DataTable)ResultObj.ResultObject;
            MessageBox.Show(ResultObj.PassedArgs["deptid"].ToString());
            MessageBox.Show(dtUser.Rows[2]["UserName"].ToString());
            MessageBox.Show("Done");
        }


Hope this example will help to all who wants to use Background worker class to run long running methods in separate thread. Feel free to post your comments.

Background Worker Overview with Example in Winforms - Part 1

Recently, while working on Winform Application, we require certain time consuming tasks on Form load to run in separate Thread. We decided to use Background Worker Component in our application. However, there is need that Background Component will be used in multiple forms. So I decided to create a class which inherits from BackgroundWorker Class and implemented certain common functionality over there. I like to share the code and overview of Background worker class.

BackgroundWorker Component Overview:

The BackgroundWorker class allows you to run an operation on a separate, dedicated thread. Time-consuming operations like
  •     Image downloads
  •     Web service invocations
  •     File downloads and uploads (including for peer-to-peer applications)
  •     Complex local computations
  •     Database transactions
  •     Local disk access
can cause your user interface to hang while they are running. When you want a responsive UI and you are faced with long delays associated with such operations, the BackgroundWorker component provides a convenient solution.

The BackgroundWorker component gives you the ability to execute time-consuming operations asynchronously ("in the background"), on a thread different from your application's main UI thread.

To use a BackgroundWorker, you simply tell it what time-consuming worker method to execute in the background, and then you call the RunWorkerAsync method. Your calling thread continues to run normally while the worker method runs asynchronously. When the method is finished, the BackgroundWorker alerts the calling thread by firing the RunWorkerCompleted event, which optionally contains the results of the operation.

The BackgroundWorker component is available from the Toolbox, in the Components tab. To add a BackgroundWorker to your form, drag the BackgroundWorker component onto your form. It appears in the component tray, and its properties appear in the Properties window.

By using a pattern of method calls (RunWorkerAsync, ReportProgress) and event callbacks (DoWork, ProgressChanged, RunWorkerCompleted), BackgroundWorker helps you easily create a background thread and factor out the stuff that should be running on the background thread versus the foreground thread. 

If your background operation requires a parameter, call RunWorkerAsync with your parameter. Inside the DoWork event handler, you can extract the parameter from the DoWorkEventArgs.Argument property. 

Below image shows the flow of working of Background Worker model.


Above is the brief overview of how Background worker class works and what are its key events and methods. In the next article [Background worker example - Filling dataset in separate thread - Part 2], I explained working of Background worker class with code, which fills the Dataset in background and also shows the progress-bar while running the process in background.

Saturday, February 26, 2011

Simple Tips for Healthy Living for Software Engineers

Simple tips for healthy living for Software Engineers

This tips are specially for Software Engineers who usually sits for 8-10 hours a day in front of computers solving complex problems of world and have no time to take care of health. One can minimize ill effects of stress and stay healthy by following a few simple tips as below.

1. Get adequate sleep:

Remember that not getting enough sleep will do you harm in the long run. you will feel drowsy during the day, unable to concentrate on simple tasks and feel irritable. Try to get at least seven hours of sleep every day. Avoid keeping Televisions, Computer and gadgets in your bedroom, don’t eat large meals before bedtime, follow regular bedtimes and wake times. Ensure your bedroom is quite and relaxing.

2. Drink Hot Water:

While it may take a little while to get used to having hot water; it will greatly benefit you. It purifies your body and helps remove unwanted properties as well. Your digestive system will work smoothly and also clear out your skin.

3. Spend lesser time on Social Networking Sites:

Researchers say that an increasingly high number of people prefer to spend time surfing the internet and spending time on social networking sites instead of pursuing a hobby. Ask yourself how much time you spend on networking sites every week and whether it is worth it. Opt for a hobby, which will give you a chance to enjoy, learn something new and meet new people.

4. Exercise:

You don’t need to pump iron six days a week in a gym to stay in shape. A brisk walk for 30 minutes every day in your neighborhood will do you a whole lot of good. Do a few simple stretches and exercises every alternate day at home or alternatively start doing yoga and meditation. Walking, cycling, swimming or even dancing are great stress busters and also keep you in shape.

5. Quit Smoking:

If you have finally made up your mind to kick this habit, it’s really good for your health. To quit successfully you need encouragement and support from your doctor, family, friends, and coworkers. A doctor will help you tailor an approach that suits you best.

6. Follow a healthy diet:

Try eating a whole grain sandwich before your big meal, eat smaller portions of high calorie dishes, ask yourself if you’re an emotional eater, and avoid reaching out for snacks while watching TV. Include more vegetables and fruits in your daily diet. If you're trying to loose weight, don't starve yourself.

7. Blink your eyes at regular interval:

Follow the 20-20-20 rule. After every 20 minutes of work, look 20 feet away from the computer screen and blink 20 times. Also lubricate your eyes at regular interval to avoid dryness of eyes. Use lubricating eye drops in both the eyes before every session on the computer. Consult your eye surgeon before using any eye drops.


Wednesday, January 19, 2011

Multiple Active Result Sets (MARS) in SQL Server

Before few days, one of my colleague came with one issue - he was getting error while opening multiple DataReader with single Connection object i.e. he is trying to open 2nd datareader with same connection object in Loop. And he got error - There is already an open DataReader associated with this Command which must be closed first. I search and get way to open multiple DataReader connections with SQLServer and like to share with all.

Sql Server supports MARS (Multiple Active Result Sets) and we need to set MultipleActiveResultSets=true in connection string. Below is Connection string syntax and Code to demonstrate opening datareader in while loop (multiple datareader). MARS is supported from SQL Server 2005 Version.

Connection String:

<add name ="DBConnstr" connectionString ="Data Source=xxx.yyy.zzz.aa;Initial Catalog=name;User Id=id;Integrated Security=False;Password=pwd;MultipleActiveResultSets=true"  providerName ="System.Data.SqlClient" />

Code:

string strConn = ConfigurationManager.ConnectionStrings["DBConnstr"].ConnectionString;
string strSql = "select * From OrderDetail where OrderID = {0}";
string strOutput = "OrdNumber: {0} - Desc: {1}";

using (SqlConnection con = new SqlConnection(strConn))
{
 //Opening Connection   
 con.Open();

 //Creating two commands form current connection   
 SqlCommand cmd1 = con.CreateCommand();
 SqlCommand cmd2 = con.CreateCommand();

 //Set the comment type   
 cmd1.CommandType = CommandType.Text;
 cmd2.CommandType = CommandType.Text;

 //Setting the command text to first command   
 cmd1.CommandText = "select OrderID From [OrderMaster]";

 //Execute the first command   
 IDataReader idr1 = cmd1.ExecuteReader();
 while (idr1.Read())
 {
  //Read the first Tree value from data source       
  int intTree = Convert.ToInt32(idr1.GetInt16(0));

  //create another command, which get values based on Tree value       
  cmd2.CommandText = string.Format(strSql, intTree);

  //Execute the reader       
  IDataReader idr2 = cmd2.ExecuteReader(); // If MARS is not enable in Conn string ; error will come at this line.
  while (idr2.Read())
  {
   //Read the values from Reader 2
   Console.WriteLine(string.Format(strOutput, idr2.GetString(1), idr2.GetString(4)));
  }
  //Dont forgot to close second reader, this will just close reader not connection       
  idr2.Close();
 }
 idr1.Close();
}


Friday, November 12, 2010

DayLight Saving and DateTime in .Net

Today, while looking to solve one issue related to DataTime in .Net, I came across article from MSDN that describes the best practice recommendations for writing programs that use the DateTime type in Microsoft .NET-based applications and assemblies.

While going through article, I came across the Daylight saving time (DST) and its impact on Applications. So I decided to give brief about DST and will discuss how it effects the Programmers.

Daylight saving time:

Daylight saving time (DST)—also summer time in British English is the practice of temporarily advancing clocks during the summer time so that afternoons have more daylight and mornings have less. Typically clocks are adjusted forward one hour near the start of spring and are adjusted backward in autumn.

In a typical case where a one-hour shift occurs at 02:00 local time, in spring the clock jumps forward from 02:00 standard time to 03:00 DST and that day has 23 hours, whereas in autumn the clock jumps backward from 02:00 DST to 01:00 standard time, repeating that hour, and that day has 25 hours.

A digital display of local time does not read 02:00 exactly at the shift, but instead jumps from 01:59:59.9 either forward to 03:00:00.0 or backward to 01:00:00.0. Clock shifts are usually scheduled near a weekend midnight to lessen disruption to weekday schedules.

Advantages of DST:
  • Many countries observe DST, and many do not. The reason many countries implement DST is in hopes to make better use of the daylight in the evenings.
  • Some believe that it could be linked to reducing the amount of road accidents and injuries.
  • The extra hour of daylight in the evening is said to give children more social time with friends and family
  • DST can even boost the tourism industry because it increases the amount of outdoor activities.
  • Majority of people also believe that DST saves energy as it influences people to spend more time out of the house, thus decreasing the need for artificial lighting as well as the likelihood of using home electric appliances.

Disadvantages of DST:
  • Flight schedules and inaccurate transportation timetables have caused confusion among travelers, for both personal and business purposes, and regular commuters. The transport industry needed to take into account the costs for adjusting to new time schedules.
  • Other complaints about daylight saving include the safety fears in the dark mornings, especially for school children waiting for a bus in some areas. Those who went early to work or study, they would be leaving their homes in the dark, the time when crime was at its highest, putting them in potentially dangerous situations.
  • Farming groups have also expressed anti-daylight saving views, saying that daylight saving time had a significant adverse impact on rural families, businesses, and communities. There are also those who express health concerns linked with daylight saving time.

Daylight Saving Time and .Net:

Consider a case when on particular morning during DST, at 2:00 AM, the local clock is reset to 1:00 AM, creating a 25-hour day. Since all values of clock time between 1:00 AM and 2:00 AM occur twice on that particular morning—at least in most of the United states and Canada. The computer really has no way to know which 1:10 AM was meant—the one that occurs prior to the switch, or the one that occurs 10 minutes after the daylight savings time switch.

Similarly, programs have to deal with the problem that happens in the springtime when, on a particular morning, there is no such time as 2:10 AM. The reason is that at 2:00 on that particular morning, the time on local clocks suddenly changes to 3:00 AM. The entire 2:00 hour never happens on this 23-hour day.

Programs have to deal with these cases (Particularly applications that deals with Scheduler. Such as Marketing Emails to send during night hours or taking Backup during night), possibly by prompting the user when you detect the ambiguity. 

If you aren't collecting date-time strings from users and parsing them, then you probably don't have these issues. Programs that need to determine whether a particular time falls in daylight savings time can make use of the following:
    Timezone.CurrentTimeZone.IsDaylightSavingTime(DateTimeInstance)
or
DateTimeInstance.IsDaylightSavingTime
   
So, if you need to perform DateTime calculations (add/subtract) on values representing time zones that practice daylight savings time, unexpected calculation errors can result. Instead, convert the local time value to universal time, perform the calculation, and convert back to achieve maximum accuracy.

For the complete tips for dealing with DateTime, go through the below link from MSDN.

http://msdn.microsoft.com/en-us/library/ms973825.aspx

I believe that above link from MSDN is helpful to all the Programmers. If we take care of above points, our software are least prone to errors.


For further details on DST:
http://www.timeanddate.com/time/dst/

Thursday, October 14, 2010

Accessing Master page control values from child page

Accessing Master page control values from child page:

Today, I am discussing about very common requirement where we need to access value of Master page from Child page. We will consider a case where there is dropdownlist in Master page and on change of dropdownlist, we will use selected value of Dropdownlist in child page. Lets start by following below steps:

1. Create Master page and add dropdownlist on aspx page

<asp:DropDownList ID="ddlThemes" runat="server" AutoPostBack="true" OnSelectedIndexChanged="ddlThemes_OnSelectedIndexChanged">
<asp:ListItem Text="Select Theme" Value="0" Selected="true"></asp:ListItem>
<asp:ListItem Text="Red" Value="Red"></asp:ListItem>
<asp:ListItem Text="Blue" Value="Blue"></asp:ListItem>
<asp:ListItem Text="Green" Value="Green"></asp:ListItem>
</asp:DropDownList>

2. We need to raise an event when dropdownlist is changed. For this create public event and raise event from dropdownlist selectedindex change event in masterpage.cs file

public event CommandEventHandler ThemeChanged;
protected void ddlThemes_OnSelectedIndexChanged(object sender, EventArgs e)
{
    if (ddlThemes.SelectedIndex != 0 && ThemeChanged != null)
        ThemeChanged(this, new CommandEventArgs(ddlThemes.SelectedItem.Text, ddlThemes.SelectedValue));
}

3. Now create child page referring to above master page created. Add below code in aspx file:

<%@ Page Language="C#" AutoEventWireup="true" MasterPageFile="~/MasterPages/masterpage.master" CodeFile="ChildPage.aspx.cs" Inherits="ChildPage" %>
<%@ MasterType VirtualPath="~/MasterPages/masterpage.master" %>

4. Now write the code to handle the event (created in Master page) in child code behind page:
public partial class ChildPage : System.Web.UI.Page
{
    protected void Page_Init(object sender, EventArgs e)
    {
        Master.ThemeChanged += new CommandEventHandler(ThemeChangedFromMasterPage);
    }
    private void ThemeChangedFromMasterPage(object sender, CommandEventArgs e)
    {
        string ThemeText = e.CommandName;
        string ThemeValue = e.CommandArgument.ToString();
        Response.Write(ThemeText + " " + ThemeValue);
    }
}

That's all. Above steps will also help you to understand concept of Events and Events Handlers in .Net.

Friday, October 8, 2010

Google Announcing Google TV: TV meets web. Web meets TV.

Google had launched its official website this week for Google TV (a new experience of enjoying TV and Web together). Check out all the features of Google TV here. Some of the features of Google TV are quite interesting i.e. multiple phones acting as remote control, voice search, watching and browsing simultaneously, recording of program and great home page for TV. I hope with introduction of Google TV, TV will no longer be 'idiot box' and will become an interactive way to do lot more things.

There are some questions arises with introduction of Google TV, i.e. Does Google TV will replace Personal Computers in near future? Will all websites owners do changes to make compatible with Google TV?

For the Software Professionals, Google TV is built on Android and comes with the Google Chrome web browser. If you are interested in learning more about how to optimize website for viewing on Google TV, please visit developer page.

Also, I think I need to wait for another year for Google TV to come in India. Hope Google will launch Google TV soon in India.
Also check out Official Google Blog Announcing Google TV.

Checkout Logitech Revue and other stuff to use with your existing TV:

1. Logitech Mini Controller for Logitech Revue and Google TV


2.Logitech Keyboard Controller for Logitech Revue and Google TV


3. Logitech Revue Companion Box with Google TV and Keyboard
 

Wednesday, October 6, 2010

Agile methodology and Scrum

Today, in majority of IT / Non IT organizations, management is following Agile Methodology for the execution of the projects. Earlier also we might have completed projects successfully following same methods as Agile suggests but we were not known about terms and all tools that supports Agile. Today, I like to share concept, benefits and tools that support Agile Methods.

Agile methodology: Agile methodology is an approach to project management, typically used in software development. It helps teams respond to the unpredictability of building software through incremental, iterative work cadences, known as sprints.

It is very effective where Client frequently changes his requirement. Since it has more iteration, you can assure a solution that meets client requirements. It involves more client interaction and testing effort.

Agile Methodology Characteristics:
  • More Iterations
  • Frequent Delivery
  • Test frequently
  • Less defects
  • Accepts change of requirement at any stage, even late in development.
  • Continuous attention to technical excellence and good design enhances agility.
There are various methods by which Agile methodology can be implemented:-
  1. Extreme Programming (XP)
  2. Scrum
  3. Crystal
  4. Adaptive Software Development (ASD)
  5. Feature Driven Development (FDD)
  6. Dynamic Systems Development Method(DSDM)
  7. Lean software development
  8. XBreed
Out of the above methods Scrum and Extreme Programming (XP) are mostly used. We will discuss Scrum here.

Scrum: Scrum is an agile framework for completing complex projects. Scrum originally was formalized for software development projects, but works well for any complex, innovative scope of work. The possibilities are endless. The Scrum framework is deceptively simple.

In Scrum, projects are divided into succinct work cadences, known as sprints, which are typically one week, two weeks, or three weeks in duration. At the end of each sprint, stakeholders and team members meet to assess the progress of a project and plan its next steps. This allows a project’s direction to be adjusted or reoriented based on completed work, not speculation or predictions.

The Roles of Scrum:

Scrum has three fundamental roles: Product Owner, Scrum Master, and Team members.

1. Product Owner: In Scrum, the Product Owner is responsible for communicating the vision of the product to the development team. He or she must also represent the customer's interests through requirements and prioritization. Because the Product Owner has the most authority of the three roles, it's also the role with the most responsibility. In other words, the Product Owner is the single individual who must face the music when a project goes awry. At the same time, Product Owners must be available to answer questions from the team.

2. Scrum Master: The ScrumMaster acts as a liaison between the Product Owner and the team. The ScrumMaster does not manage the team. Instead, he or she works to remove any impediments that are obstructing the team from achieving its sprint goals. In short, this role helps the team remain creative and productive, while making sure its successes are visible to the Product Owner. The ScrumMaster also works to advise the Product Owner about how to maximize ROI for the team.

3. Team Members: In the Scrum methodology, the team is responsible for completing work. Ideally, teams consist of seven cross-functional members, plus or minus two individuals. For software projects, a typical team includes a mix of software engineers, architects, programmers, analysts, QA experts, testers, and UI designers. Each sprint, the team is responsible for determining how it will accomplish the work to be completed. This grants teams a great deal of autonomy, but, similar to the Product Owner’s situation, that freedom is accompanied by a responsibility to meet the goals of the sprint.

The Scrum Framework:

A typical working model of Scrum is described as below:
  • A product owner creates a prioritized wish list called a product backlog.
  • During sprint planning, the team pulls a small chunk from the top of that wish-list, a sprint backlog, and decides how to implement those pieces.
  • The team has a certain amount of time, a sprint, to complete its work - usually two to four weeks - but meets each day to assess its progress (daily scrum).
  • Along the way, the ScrumMaster keeps the team focused on its goal.
  • At the end of the sprint, the work should be potentially shippable, as in ready to hand to a customer, put on a store shelf, or show to a stakeholder.
  • The sprint ends with a sprint review and retrospective.
  • As the next sprint begins, the team chooses another chunk of the product backlog and begins working again.
Below image shows the Scrum framework:


The cycle repeats until enough items in the product backlog have been completed, the budget is depleted, or a deadline arrives. Which of these milestones marks the end of the work is entirely specific to the project. No matter which impetus stops work, Scrum ensures that the most valuable work has been completed when the project ends.

Meetings: Meetings play an important role in Scrum. Following different types of meetings are held at different stages of Scrum.

1. Daily Scrum: Each day during the sprint, a project status meeting occurs. This is called a "daily scrum", or "the daily stand-up". This meeting has specific guidelines:
  • The meeting starts precisely on time.
  • The meeting is time-boxed to 15 minutes
  • The meeting should happen at the same location and same time every day
During the meeting, each team member answers three questions:
  • What have you done since yesterday?
  • What are you planning to do today?
  • Do you have any problems preventing you from accomplishing your goal? (It is the role of the ScrumMaster to facilitate resolution of these impediments. Typically this should occur outside the context of the Daily Scrum so that it may stay under 15 minutes.)
2. Sprint Planning Meeting: At the beginning of the sprint cycle (every 7–30 days), a "Sprint Planning Meeting" is held.
  • Select what work is to be done
  • Prepare the Sprint Backlog that details the time it will take to do that work, with the entire team
  • Identify and communicate how much of the work is likely to be done during the current sprint
  • Eight hour time limit. 1st four hours: Product Owner + Team: dialog for prioritizing the Product Backlog. 2nd four hours: Team only: hashing out a plan for the Sprint, resulting in the Sprint Backlog
At the end of a sprint cycle, two meetings are held: the "Sprint Review Meeting" and the "Sprint Retrospective"

3. Sprint Review Meeting:
  • Review the work that was completed and not completed
  • Present the completed work to the stakeholders ("the demo")
  • Incomplete work cannot be demonstrated
  • Four hour time limit
4. Sprint Retrospective:
  • All team members reflect on the past sprint
  • Make continuous process improvements
  • Two main questions are asked in the sprint retrospective: What went well during the sprint? What could be improved in the next sprint?
  • Three hour time limit
Benefits of Scrum:
  • First thing first: A well-functioning Scrum will deliver the highest business value features first and will avoid building features that will never be used by the customer. Since industry data shows that about half of the software features developed are never used, development can be completed in half the time by avoiding waste, or unnecessary work.
  • High Productivity & Quality: In most companies, development is slowed down by issues identified as impediments during the daily meetings or planning and review meetings. With Scrum, these impediments are prioritized and systematically removed, further increasing productivity and quality.
  • Ease Pressure @ Work: Scrum removes management pressure from teams. Teams are allowed to select their own work, and then self-organize through close communication and mutual agreement within the team on how best to accomplish the work. In a successful Scrum, this autonomy can significantly improve the quality of life for developers and enhance employee retention for managers.
We can say that simple rules of Scrum are: continual inspection, adaptation, self-organization, and emergence of innovation. 

This can produce an
- exciting product for the customer,
- develop high team spirit and satisfying work,
- generate high productivity and customer satisfaction, and
- achieve the market and financial goals of the company.
- a win-win situation for company and team members.

As a result, Scrum is being widely adopted worldwide in companies large and small, localized or distributed, open source or proprietary, for virtually any type or size of project.

Burn Down Chart:
Here, we will also discuss about Burn Down chart - a very common term in Agile Methodology. Burn Down Chart is for tracking day to day project/resources activities.

The Burn Down chart is a publicly displayed chart showing remaining work in the sprint backlog. Updated every day, it gives a simple view of the sprint progress. It also provides quick visualizations for reference.

It short, Burn Down Chart is a graphical representation of work left to do versus time. The outstanding work (or backlog) is often on the vertical axis, with time along the horizontal. That is, it is a run chart of outstanding work. It is useful for predicting when all of the work will be completed. Sample Burn Down chart is shown below:


With the help of Burn Down chart we can get clear idea of following attributes:

1. List of task to be done
2. Timeliness
3. Status
4. Remarks/comments
5. Actions to be taken against pending items in project
6. Extra time spent on lunch, tea, etc

Hope above information will helpful to start your new project with Agile Methodology.

Some of the Agile software Project management Open Source Tools:
http://www.icescrum.org/
http://www.agile42.com/cms/pages/
http://www.agile-tools.net/